Classic Homemade Bread: Simple, Soft, and Delicious
Introduction:
Nothing is more satisfying than the smell from freshly-baked bread in the air in your home. The Classic Homemade Bread recipe delivers an easy, yet delicious loaf that has a soft, smooth interior, and a golden brown crust. Ideal for sandwiches, toast or just enjoying it with butter. It can be a testimony to the delight of home-cooked baking.
Why You’ll Love This Recipe:
- The Basic Ingredients This recipe requires food items that are commonly found in the kitchen, making the recipe budget-friendly and accessible.
- Simple to Follow: The steps are easy and straightforward, making it suitable for bakers at different levels.
- Multi-purpose: This bread is great for a range of purposes, from toast for breakfast and dinner rolls.
- Rewards: The satisfaction of making your own bread cannot be matched. The amazing outcomes will leave you wanting more.
INGREDIENTS YOU’LL NEED:
-
For the Dough:
- Warm water (105-115degF 40-45degC)
- Active dry yeast
- Sugar that is granulated
- Bread flour
- All-purpose flour
- Salt
- Unsalted or olive oil and melted
HOW TO MAKE CLASSIC HOMEMADE BREAD:
STEP-BY-STEP INSTRUCTIONS:
-
Activate the Yeast:
- In a small bowl mix hot water, yeast, as well as a small amount of sugar.
- Allow it to stand for 5-10 minutes or until it is bubbly and foamy.
-
Combine the Dry Ingredients:
- Within a bowl combine the baking flour and all-purpose flour as well as salt.
-
Make the Dough:
- Incorporate the activated yeast mix as well as the olive oil that has been melted (or butter) to the dry ingredients.
- Make sure to stir until a squishy dough is formed.
-
Knead the Dough:
- Move the dough onto a surface that has been lightly sprayed with flour and then knead it for about 8 to 10 minutes, or until dough is soft and elastic.
- Additionally, you can make use of a stand mixer with dough hooks, to make the dough into a ball for around 7 to 7 minutes.
-
First Rise:
- Put the dough into an oily bowl and then making sure to coat the entire surface.
- The bowl should be covered with the plastic wrap or clean kitchen towel, and let the dough rest in a cool, draft-free location until the dough has the dough has doubled in size. This could take about 1-1.5 hours.
-
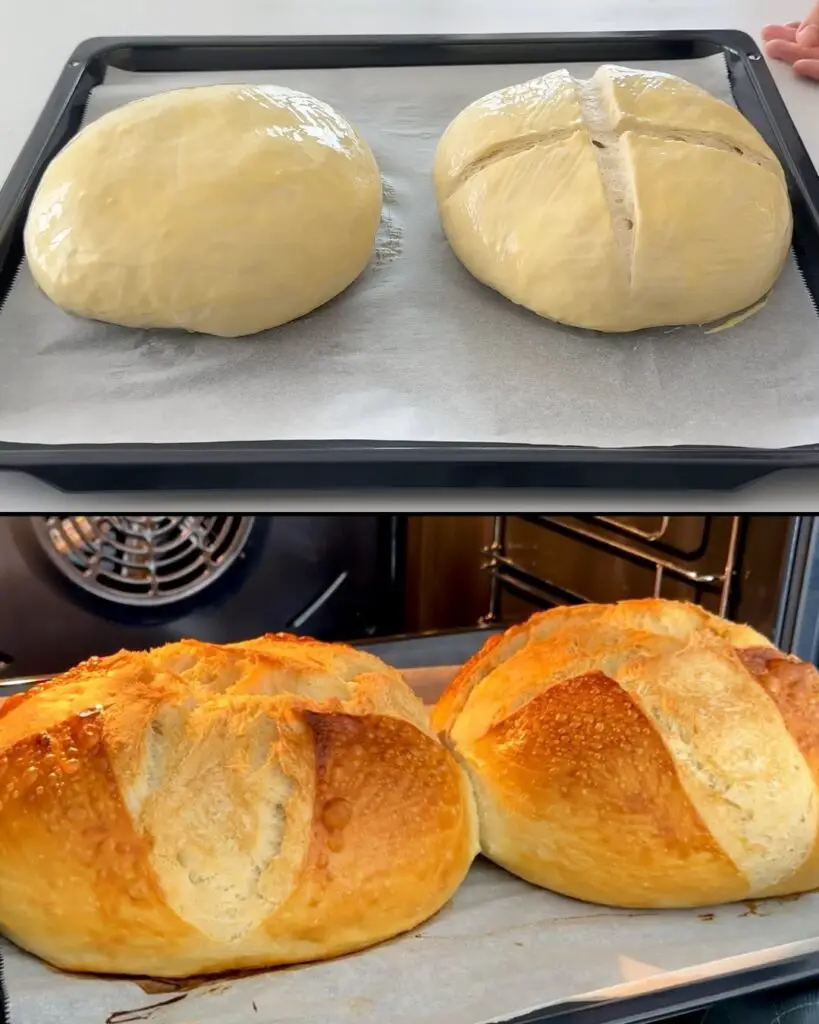
Shape the Dough:
- Make sure to press down on the dough to let the air out.
- Form your dough in a loaf, then put it into a greased 9×5-inch loaf pan.
-
Second Rise:
- Wrap the loaf pan with plastic wrap or kitchen towel. Let the dough rise once more until the dough has grown to a size of double, approximately 30-45 minutes.
-
Bake the Bread:
- Pre-heat your oven to 350degF (190degC).
- Baking the bread 30 to 35 minutes, or until its surface is golden brown and the bread is hollow when you tap it.
- If the skin is turning brown rapidly, you can wrap it in aluminum foil.
-
Cool and Enjoy:
- The bread should be removed from the pan, and allow it to rest for a while on a wire rack prior to cutting it and serving.
HELPFUL TIPS:
- Choose the correct water Temperature The water must feel warm However, it should not be hot enough so that the yeast can be activated but not kill it.
- Knead firmly: Kneading develops the gluten within the dough that gives bread its texture and structure.
- Warm and Comfortable Environments: Warm, dry location is the ideal place for dough to get a chance to rise. The best way to achieve an environment that is warm by putting the bowl into an oven that is slightly warm or next to a bright window.
- Check for doneness: It is ready when it’s golden brown and makes a hollow sound when it is tapped at the top.
- Cool completely: Let the bread fully cool by placing it on wire racks prior to cutting to prevent it from becoming sticky.
DETAILS:
- Prep Timing: 20 minutes
- Start Time: 1.5 to 2 hours
- Cook Time: 30-35 minutes
- Total Duration: Approximately 3 hours
- Yield 1 loaf
- Category: Bread
- Method: Baked
- Cuisine: International
- Diet: Vegetarian
NOTES:
- It is possible to experiment with various varieties of flour including whole wheat flour and rye flour to create a variety in texture and flavor.
- You can add a tablespoon in honey or molasses into the dough for a sweeter loaf.
- Sprinkle the surface of the loaf using warm butter or milk prior to baking to create a more moist crust.
FREQUENTLY ASKED QUESTIONS:
- What if I used instant yeast in lieu of dry active yeast? Yes, you are able to use instant yeast however, you are able to skip the activation process and simply just add it to dry ingredients.
- My dough did not rise. What could be the cause? A variety of elements can impact the rise of dough. These include temperatures of water and quality of the yeast as well as the environment in which it is rising. Check that your water is warm but not hot, and yeast is clean and active.
- How can I store my the bread I make myself? Store the cooled bread in a loaf box or airtight container in a temperatures of room temperature for up three days. It is also possible to put the bread in freezers for more storage.
STORAGE INSTRUCTIONS:
- Room Temperature Place it in a loaf box or airtight containers at room temperature up to 3 days.
- Freezing: Cover the loaf with plastic wrap tightly and aluminum foil. Then put it into an airtight freezer bag. The bread can be frozen for up to three months. Then, let it thaw for a few hours at room temperature or in the fridge.
Related Recipes:
If you enjoyed the Classic Homemade Bread recipe, it is possible that you will also love the following bread recipes:
- No-Knead Bread
- Whole Wheat Bread
- French Baguette
CONCLUSION:
Making your own bread can be an enjoyable experience so it’s a rewarding experience, and this Classic Homemade Bread recipe is an ideal place to begin. It’s easy to make and simple instructions, you’ll have the smell and taste from freshly-baked bread within minutes. Happy baking!