Irresistibly Gooey Marshmallow Caramel Corn: The Ultimate Sweet and Salty Treat
Are you searching for the perfect snack that combines the satisfying crunch of popcorn, the rich sweetness of caramel, and the fluffy delight of marshmallows? Look no further! This Marshmallow Caramel Corn recipe delivers all that and more. It’s a guaranteed crowd-pleaser, perfect for movie nights, parties, gifts, or simply indulging your sweet tooth.
This recipe is more than just a list of ingredients and instructions. It’s a complete guide, designed to help even beginner cooks achieve perfect results. We’ll cover everything from popping the perfect popcorn to creating a luscious, homemade caramel, and finally, incorporating that magical marshmallow goodness.
Get ready to transform ordinary popcorn into an extraordinary treat that will have everyone asking for more! This recipe is easy to customize, making it perfect for any occasion.
Why You’ll Love This Marshmallow Caramel Corn Recipe
This isn’t your average caramel corn. The addition of marshmallow creates a uniquely soft and chewy texture that contrasts beautifully with the crispness of the popcorn and the hardened caramel. It’s a textural symphony in your mouth!
The homemade caramel sauce is far superior to anything you’ll find in store-bought versions. It’s made with simple ingredients – butter, brown sugar, corn syrup, and vanilla – but the flavor is deep, rich, and buttery. You’ll never go back to pre-made caramel corn again.
This recipe is surprisingly easy to make. While it does involve a few steps, each one is straightforward and clearly explained. Even if you’ve never made caramel before, you can confidently tackle this recipe.
It’s incredibly versatile. You can customize it with your favorite add-ins, like nuts, chocolate drizzles, or sprinkles. Make it your own and create a signature snack that reflects your personal taste.
This Marshmallow Caramel Corn makes a fantastic homemade gift. Package it in decorative tins or cellophane bags, tie it with a ribbon, and you have a thoughtful and delicious present for any occasion.
Ingredients You’ll Need: Simple Pantry Staples
The beauty of this recipe lies in its simplicity. You likely already have most of the ingredients in your pantry. No need for fancy or hard-to-find items!
For the Popcorn:
-
Unpopped Popcorn Kernels: The foundation of our treat! You’ll need 1/2 cup, which will yield a generous amount of popped corn.
-
Coconut Oil (or other high-heat oil): Coconut oil is preferred for its clean flavor and high smoke point, but canola or vegetable oil will also work.
For the Caramel Sauce:
-
Unsalted Butter: Provides richness and that classic caramel flavor. Unsalted butter gives you more control over the saltiness of the final product.
-
Light Brown Sugar: Adds sweetness and depth of flavor. The molasses in brown sugar contributes to the caramel’s characteristic color and taste.
-
Light Corn Syrup: Prevents the sugar from crystallizing, ensuring a smooth and creamy caramel.
-
Salt: Enhances the sweetness and balances the flavors. A small amount makes a big difference.
-
Vanilla Extract: Adds a warm, aromatic note that complements the caramel perfectly.
For the Marshmallow Coating:
- Marshmallow creme/fluff: You can use a jar, providing a convenient, no-melt option.
- Marshmallows: You can use regular size.
Equipment Checklist: Tools for Success
Having the right tools on hand will make the process smooth and enjoyable. Here’s what you’ll need:
-
Large Pot with Lid: Essential for popping the popcorn. A heavy-bottomed pot is best for even heat distribution.
-
Large Baking Sheets (at least 2): For spreading out the popcorn and baking it (optional, but recommended).
-
Parchment Paper or Silicone Baking Mats: Prevents the caramel corn from sticking to the baking sheets.
-
Large Mixing Bowls (at least 2, heatproof): For mixing the popcorn, caramel, and marshmallow.
-
Saucepan (medium-sized): For making the caramel sauce.
-
Whisk: For stirring the caramel sauce and ensuring it’s smooth.
-
Heat-Resistant Spatula: For folding the caramel and marshmallow into the popcorn.
-
Measuring Cups and Spoons: For accurate measurements of ingredients.
Step-by-Step Instructions: Making Marshmallow Caramel Corn
Now, let’s get to the fun part – making the Marshmallow Caramel Corn! Follow these instructions carefully for the best results.
Step 1: Pop the Perfect Popcorn
-
Place your large pot over medium-high heat. Add the coconut oil (or your chosen oil) and 2-3 test kernels.
-
Once the test kernels pop, add the remaining 1/2 cup of popcorn kernels.
-
Cover the pot immediately and shake it gently but continuously over the heat.
-
Continue shaking until the popping slows down significantly, with several seconds between pops.
-
Remove the pot from the heat immediately to prevent burning.
-
Pour the popped corn into a very large bowl (or two bowls) and carefully remove any unpopped kernels.
Step 2: Craft the Delicious Homemade Caramel Sauce
-
In your medium saucepan, melt the butter over medium heat.
-
Add the brown sugar, corn syrup, and salt to the melted butter. Stir well to combine.
-
Bring the mixture to a boil, stirring constantly.
-
Once boiling, stop stirring. Allow the mixture to boil undisturbed for 4-5 minutes. This is crucial for the caramel to reach the correct temperature.
-
Remove from heat, add vanilla.
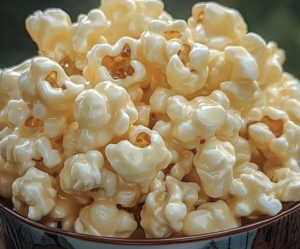
Step 3: Combine the Caramel and Popcorn
-
Immediately pour the hot caramel sauce over the popped popcorn.
-
Using a heat-resistant spatula, gently fold the caramel into the popcorn, ensuring that all the popcorn is evenly coated.
Step 4: The Magic of Marshmallow
- Add the marshmallow creme/fluff or melted marshmallows.
- Gently fold all together until the popcorn is evenly coated.
Step 5: Bake for Crispy Perfection (Optional but Recommended)
-
Preheat your oven to 250°F (120°C).
-
Line your baking sheets with parchment paper or silicone baking mats.
-
Spread the caramel-coated popcorn evenly onto the prepared baking sheets.
-
Bake for 45 minutes to 1 hour, stirring the popcorn every 15 minutes. This step helps to dry out the caramel and create a crispier texture.
-
Remove the baking sheets from the oven and let the caramel corn cool completely on the baking sheets.
Step 6: Break Apart and Enjoy!
-
Once the caramel corn is completely cool, break it into smaller pieces.
-
Store in an airtight container at room temperature.
Expert Tips for Caramel Corn Success
-
Don’t overcrowd the pot when popping popcorn. If you need to make a larger batch, pop the popcorn in multiple batches.
-
Use fresh popcorn kernels. Old kernels may not pop well.
-
Be extremely careful when working with hot caramel. It can cause severe burns.
-
Stir the caramel constantly while it’s coming to a boil, but stop stirring once it reaches a full boil.
-
If you don’t have a candy thermometer, use the cold water test. Drop a small spoonful of the caramel into a glass of cold water. It should form a soft, pliable ball.
-
Work quickly when adding the caramel to the popcorn. The caramel will start to cool and set, so you want to coat the popcorn evenly before it hardens.
-
Don’t skip the baking step if you want crispy caramel corn. It makes a big difference in the texture.
-
Let the caramel corn cool completely before breaking it apart. This will prevent it from being sticky.
Frequently Asked Questions (FAQ)
Q: Can I use microwave popcorn instead of popping my own?
A: While you can, freshly popped popcorn is highly recommended for the best flavor and texture. Microwave popcorn often contains added butter, salt, and other flavorings that can interfere with the caramel.
Q: My caramel sauce is grainy. What went wrong?
A: Grainy caramel is usually caused by sugar crystals forming. This can happen if you stir the caramel after it comes to a boil or if sugar crystals from the sides of the pan get into the mixture. Make sure to stop stirring once it boils, and you can brush down the sides of the pan with a wet pastry brush to prevent crystals from forming.
Q: Can I make this recipe without corn syrup?
A: Corn syrup helps prevent sugar crystallization, resulting in a smoother caramel. While you could try substituting it with another liquid sweetener like honey or maple syrup, the results may be different.
Q: How long does Marshmallow Caramel Corn last?
A: Stored in an airtight container at room temperature, it should stay fresh for up to a week. However, it’s usually best within the first few days.
Q: Can I freeze Marshmallow Caramel Corn?
A: Yes, you can freeze it! Place it in an airtight container or freezer bag and freeze for up to 2-3 months. Thaw at room temperature before serving.
Variations and Customizations
-
Nutty Caramel Corn: Add 1-2 cups of your favorite chopped nuts (pecans, walnuts, almonds, peanuts) to the popcorn before pouring on the caramel.
-
Chocolate Caramel Corn: Drizzle melted dark, milk, or white chocolate over the cooled caramel corn.
-
Spicy Caramel Corn: Add a pinch of cayenne pepper or a dash of hot sauce to the caramel sauce for a kick.
-
Festive Caramel Corn: Add sprinkles, colored sugars, or mini candies to the warm caramel corn before baking.
-
Salted Caramel Corn: Sprinkle a little flaky sea salt over the caramel corn before baking for a sweet and salty contrast.
Conclusion: Sweet Satisfaction Awaits!
This Marshmallow Caramel Corn recipe is a guaranteed winner. It’s easy to make, incredibly delicious, and perfect for any occasion. The combination of crunchy popcorn, rich caramel, and fluffy marshmallow is simply irresistible.
So, gather your ingredients, put on your apron, and get ready to create a treat that will impress your friends and family. This recipe is a keeper, and you’ll find yourself making it again and again. Enjoy the sweet satisfaction of homemade Marshmallow Caramel Corn! Don’t be afraid to experiment with different variations and make it your own. Happy snacking!